
HEPA First Post Construction Dust Removal for Canadian Homes
HEPA First Post Construction Dust Removal for Canadian Homes
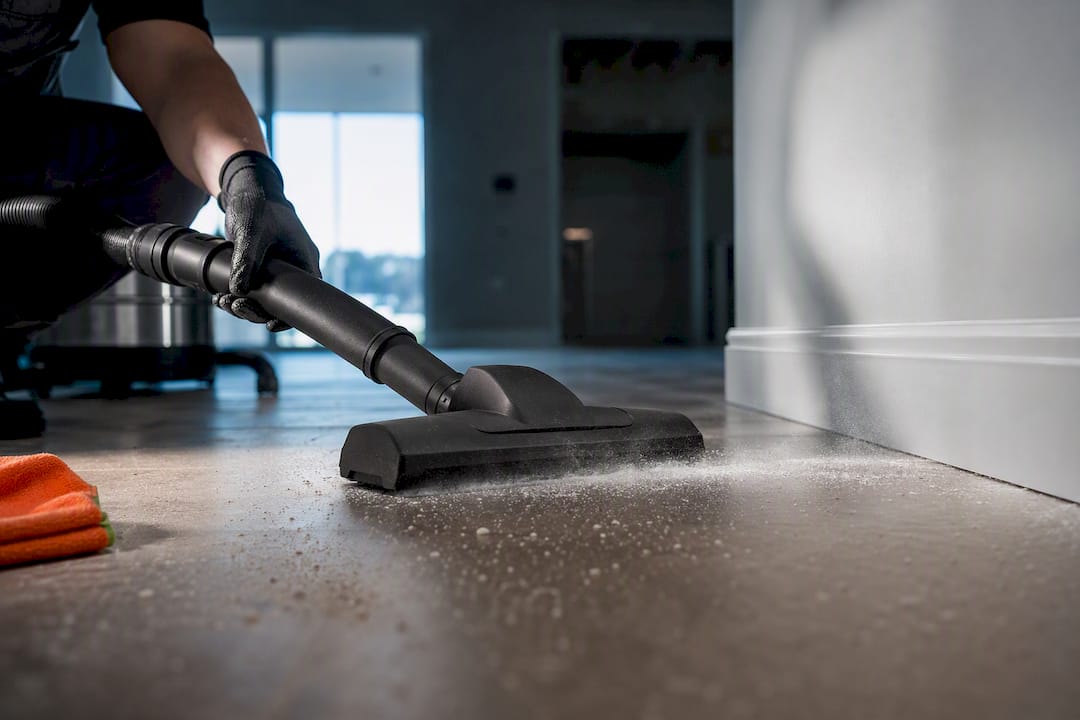
The safest way to clear post construction dust is a three-phase, HEPA-first protocol: run air scrubbers to pull fine particles from the air, follow with HEPA vacuum extraction on every surface, then finish with damp microfiber decontamination. Skip a broom or standard vacuum, since both re-aerosolize respirable silica and fine particulates. Call a professional crew for whole-house jobs, concrete or tile cutting, or homes with kids, seniors, or anyone with respiratory issues.
TL;DR:
- Use a true HEPA vacuum with sealed filtration to avoid re-aerosolizing dangerous fine dust during cleanup.
- Implement a three-phase protocol: air scrubbing for airflow control, HEPA vacuum extraction from top to bottom, then damp microfiber wiping of all surfaces.
- Keep the HVAC system off during work phases and seal vents to prevent dust redistribution, especially in homes with vulnerable occupants.
- Complete cleanup within a schedule of days to weeks, recognizing that fine particles may settle slowly and require ongoing filtration and inspection.
- Hire professional cleaning for large-scale renovations or when vulnerable people live in the home, as DIY methods are insufficient against silica-rich and fine dust.
Table of Contents
- What tools and PPE do you need for post construction dust removal?
- What is the three-phase dust removal protocol?
- How should you clean each room after construction?
- How do you stop dust from spreading through your HVAC system?
- How long does construction dust actually linger?
- When should you hire a professional cleaner instead of DIY?
- What mistakes make post-construction dust worse?
- How can you prevent dust spread during the construction phase itself?
- What kinds of dust does construction leave behind?
- What’s the right way to dispose of construction dust and debris?
- What does a professional crew catch that most homeowners miss?
- Ready to hand off your post-construction cleanup?
- Sources
What tools and PPE do you need for post construction dust removal?
The gap between a real HEPA vacuum and a “HEPA-style” shop vac is bigger than most people assume. A true HEPA system captures 99.97% of particles down to 0.3 microns and keeps that seal throughout the machine. Cheaper shop vacs marketed as HEPA-compatible often leak around the filter housing, which pushes the finest, most dangerous dust right back into your air.
Before you start, gather:
- A true HEPA vacuum with a sealed filtration chamber, not just a HEPA-marketed filter dropped into a leaky housing
- A portable air scrubber, sized for the room (most residential units handle 200 to 600 square feet per pass)
- A HEPA air purifier for ongoing use in occupied rooms
- Damp microfiber cloths and mop heads (dry dusting just relocates particles)
- N95 or P100 respirators, safety glasses, and disposable coveralls
- Sealed heavy-duty disposal bags for vacuum waste and used cloths
Renting air scrubbers and HEPA vacuums from equipment rental shops typically runs cheaper than buying for a one-time job, though frequent renovators often recoup a purchase within two or three projects.
What is the three-phase dust removal protocol?
Cleaning in the wrong order is the single biggest reason post-renovation dust lingers. Each phase has a job, and skipping ahead undoes the one before it.
- Air scrubbing and containment (hours 0 to 2). Position the air scrubber to pull air from the dustiest zone toward an exhaust point, ideally venting outdoors through a window. Keep the HVAC system off during this phase so fans don’t pull fine particles into the ductwork. Let the scrubber run continuously while you set up.
- HEPA extraction (start immediately after, run 1 to 3 hours per room). Vacuum top to bottom and far to near, meaning you work from the ceiling down to the floor, and from the room’s far corner toward the exit. This stops you from tracking cleaned dust back over surfaces you already cleared. Empty the vacuum canister outside into a sealed bag, never indoors.
- Surface decontamination (immediately following extraction). Wipe every surface with damp microfiber, rinsing frequently. Steam cleaning works well on grout lines and textured tile where dust hides in the pores. Finish with one more light HEPA pass over floors and baseboards to catch anything the damp cloths dislodged.
Pro Tip: Photograph each room after every phase. A quick photo log catches missed ledges and vent covers before you’ve packed up the equipment, and it gives you an inspection trail if you’re paying a crew for the work.
How should you clean each room after construction?
Working top to bottom, far to near isn’t just a slogan. Gravity pulls disturbed dust downward, so cleaning a floor before you’ve touched the ceiling fan above it means redoing the floor.
Move through each space in this order:
- Ceilings, fans, and light fixtures first. Wipe fan blades individually; a spinning fan post-cleaning will redistribute anything missed.
- Walls, window frames, and high ledges next. Pay attention to blinds, which trap fine dust between each slat, and check built-in shelving where dust collects on top.
- Cabinets and drawers. Open every drawer and cabinet, since dust settles inside through gaps around hardware.
- Vents and electronics. Wipe vent covers, then vacuum the vent opening itself before replacing the cover. Use compressed air on electronics rather than a damp cloth.
- Soft surfaces and textiles. Curtains, cushions, and area rugs usually need to come out for laundering or professional cleaning rather than in-place wiping.
- Floors last. Finish with HEPA vacuuming, then damp mopping on hard surfaces.
Upholstered furniture and wall-to-wall carpet are the two items most homeowners underestimate. Both trap fine dust deep in the fibres, and a household vacuum without HEPA filtration just churns it back into the air. If either was in the work zone, professional extraction cleaning is worth the cost.
How do you stop dust from spreading through your HVAC system?
Your ductwork can undo hours of careful cleaning if you let it run during the work. HVAC systems frequently turn into hidden dust reservoirs, pulling fine particles through the return vents and redistributing them through every room on the system, long after the visible mess is gone.
- Keep the HVAC system off during active demolition, cutting, or sanding, and for the air scrubbing phase afterward.
- Seal return vents in the work zone with plastic sheeting and tape.
- Create negative pressure by running an exhaust fan or a box fan facing outward in a window near the work zone, which pulls contaminated air out rather than letting it drift through the house.
- Swap to a high-MERV filter, in the MERV 13 to 16 range, or a true HEPA filter if your system supports it, and replace it regularly during the first month after the project wraps.
For homes with vulnerable occupants, plan on professional duct cleaning with source removal for at least 2 to 4 weeks after the visible cleaning is done, paired with HEPA purifiers running in key rooms. If the renovation touched multiple rooms or ran for more than a few days, standard filter swaps alone usually won’t clear what’s already settled in the duct lining. For more on keeping vents clear long-term, see this guide to cleaning air vents.
How long does construction dust actually linger?
Visible dust settles fast. Coarse particles typically drop out of the air within hours to a couple of days, which is exactly why so many people assume the room is clean once the surfaces look clear. Fine PM2.5 particles behave differently, staying airborne far longer and settling into HVAC systems and porous materials for weeks or even months without intervention.
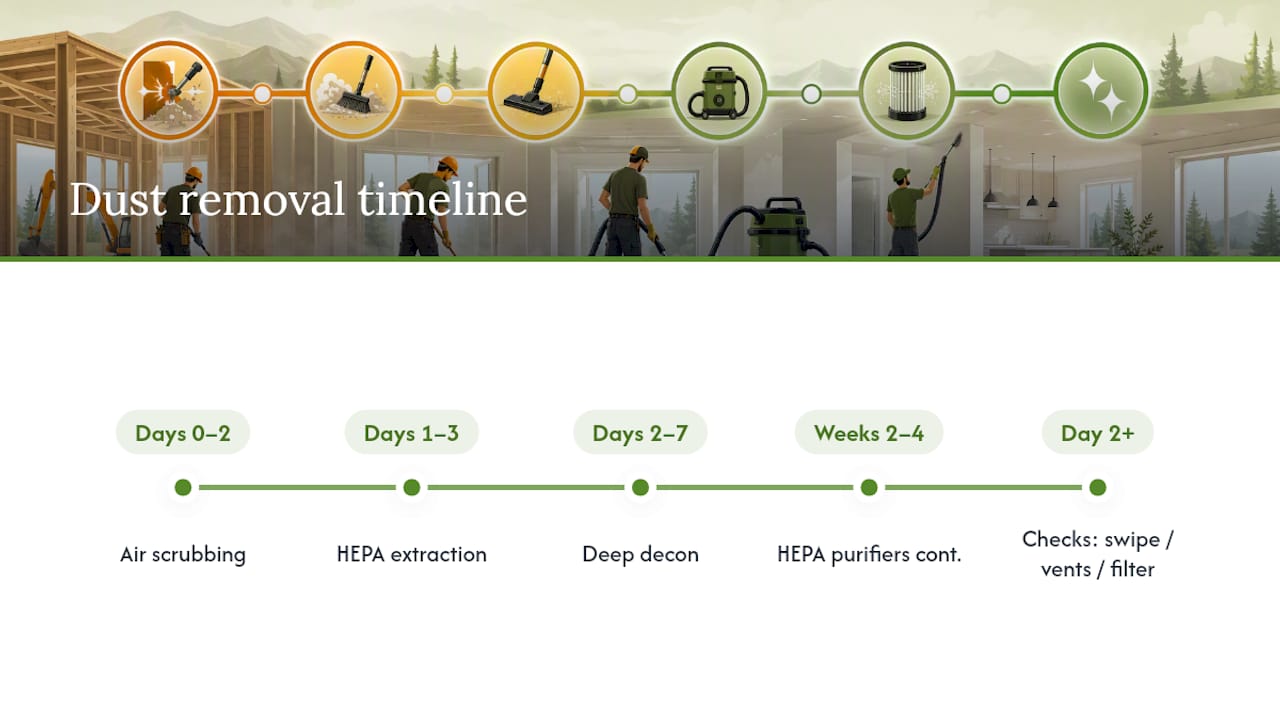
A realistic schedule looks like this: air scrubbing on days 0 to 2, HEPA extraction on days 1 to 3, deep decontamination on days 2 to 7, then HEPA purifiers running continuously for 2 to 4 weeks. Check your work with a tactile swipe along ledges, a visual look inside vent covers, and how fast your new filter loads with grey film. A basic particle meter, if you own one, gives you a number instead of a guess.
When should you hire a professional cleaner instead of DIY?
Scale and health risk are the two factors that should drive this decision, not how confident you feel with a mop. A single room touched by light sanding or painting is a reasonable DIY job if you already own true HEPA equipment. A whole-house renovation, or any job involving concrete cutting, tile demolition, or drywall sanding at scale, generates enough silica dust that professional-grade containment and extraction stop being optional.
Hire a crew when:
- The project touched more than two or three rooms, or ran longer than a few days
- Concrete, tile, or masonry cutting was involved anywhere in the home
- Children, seniors, pregnant occupants, or anyone with asthma or COPD lives there
- You don’t already own or want to rent HEPA-grade equipment
Cost typically scales with HEPA equipment rental versus purchase, whether duct cleaning is needed, and total labour hours. In most Canadian markets, expect post-construction cleaning quotes in the low hundreds for a single room up to several hundred dollars or more for a full-house job with duct work included, with exact pricing tied to square footage and how heavily the space was renovated.
What mistakes make post-construction dust worse?
The most common error is reaching for a bucket of water before the bulk dust is gone. Wet-cleaning first turns fine dust into a paste that embeds itself into textured walls, trim, and grout, and that paste is far harder to remove than dry dust ever was. A standard household vacuum is nearly as damaging, since its unsealed filter blows fine particles straight back into the room.
Set up a transition zone at the doorway where anyone leaving the work area changes out of dusty clothing or wipes down shoes, so contamination doesn’t spread into clean rooms.
Pro Tip: If you’re short on time or equipment, prioritize air purifiers in bedrooms and living rooms over the actual work zone. Protecting where people breathe most hours matters more than a perfectly clean job site.
How can you prevent dust spread during the construction phase itself?
Cleanup gets dramatically easier when contractors control dust at the source instead of letting it travel through the house. Plastic sheeting taped over doorways, called zip walls in the trade, isolate the work zone and stop dust from drifting into hallways and adjoining rooms. Painter’s tape along the sheeting seams and floor edges closes the small gaps that let fine particles escape.
Dust containment bags fitted directly to saws and sanders capture particles at the tool rather than letting them scatter across the room. This matters most during cutting and sanding, the two activities that generate the finest, most airborne silica dust. A low-dust process for door and trim work applies the same logic to fit-and-finish tasks that homeowners often overlook when they think about dust control.
Negative air pressure, created with an exhaust fan pushing air outdoors from the work zone, keeps dust from migrating into the rest of the house even when doors open and close during the day. Covering HVAC vents and shutting the system off for the duration of any cutting or sanding work prevents ductwork from becoming a distribution system.
Scheduling matters too. Doing the dustiest work, demolition, drywall sanding, and cutting, in one concentrated block rather than spread across weeks limits how many times you need to run full containment and cleanup. It also means the fine PM2.5 particles that take longest to clear get one real chance to settle and be captured, rather than a fresh wave every few days.
What kinds of dust does construction leave behind?
Not all post-renovation dust behaves the same way, and knowing what you’re dealing with changes how you clean it. Drywall dust is fine, chalky, and alkaline, and it tends to drift the farthest because individual particles are so light. It also clings to damp surfaces and painted walls through static charge, which is why it shows up in rooms nowhere near the actual work.
Wood dust from cutting or sanding is coarser and settles faster, but it’s more abrasive and can scratch finished surfaces if wiped dry instead of with a damp cloth. Concrete and masonry work produce crystalline silica dust, the particle type flagged in occupational health research as a genuine respiratory hazard, since particles fine enough to lodge deep in lung tissue can stay airborne for extended periods.
Paint and finishing dust often carries volatile organic compounds alongside particulates, meaning ventilation matters as much as vacuuming. Metal dust from fixture or fitting work is denser and settles closer to the source, but it can be sharp enough to embed in soft flooring or fabric.
The practical takeaway: a single cleaning method rarely handles every dust type equally well. Heavier wood and metal dust responds well to straightforward HEPA vacuuming, while fine drywall and silica dust need the full three-phase approach, air scrubbing first, because so much of it never settles on its own.
What’s the right way to dispose of construction dust and debris?
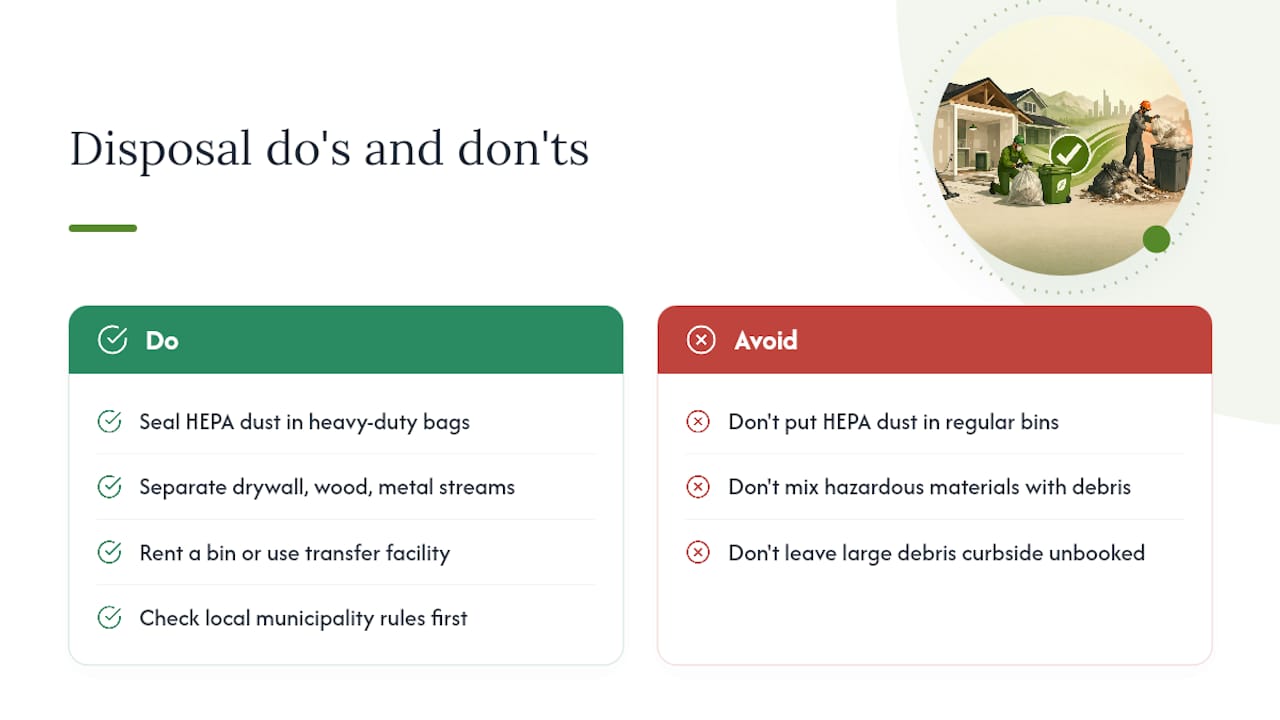
Bagging dust and debris properly matters as much as removing it in the first place. Fine dust from HEPA vacuum canisters should go into sealed, heavy-duty bags, tied off before they leave the house, not loose in a regular garbage bin where a gust of wind or a bumped bag releases everything back into the air.
Different materials often need to go through different disposal channels. Government guidance on construction, renovation, and demolition waste points to the value of separating waste streams, since materials like drywall, wood, and metal often have distinct recycling or disposal pathways rather than a single bin for everything. Some municipalities and provincial recycling programs require drywall and wood waste to be separated from general household garbage, and dumping renovation debris in curbside bins meant for regular trash can result in a missed pickup or a fine depending on local bylaws.
Larger debris, broken tile, old cabinetry, flooring offcuts, usually needs a dedicated bin rental or a trip to a construction waste transfer facility rather than your regular municipal pickup. Check your local municipality’s rules before the project starts, since some require advance booking for bulk pickup and others cap how much renovation waste curbside service will take per visit.
Keep hazardous materials, old paint cans, solvents, or anything containing asbestos in pre-1990s homes, completely separate and handled according to your municipality’s hazardous waste program. Never bag these with general dust and debris.
What does a professional crew catch that most homeowners miss?
Dedicated crews return to the same clients repeatedly, so they know exactly where dust hides in that specific space. Flat pricing and a service report after every visit mean no surprise charges and a written record of what got done. A trained team folds HEPA extraction and a final inspection into one visit instead of treating them as separate steps.
— Atelier
Ready to hand off your post-construction cleanup?
If the scope of your project has you eyeing a HEPA vacuum rental instead of your Saturday, that’s usually the sign to call in a crew rather than push through it yourself. The cleaning service sends the same dedicated crew back to your space, so the team already knows which ledges, vents, and corners tend to collect renovation dust in homes like yours, instead of a rotating group learning your layout from scratch each visit. Post-construction visits include HEPA-capable extraction, a full room-by-room protocol, and a written service report so you know what got cleaned and what to check before move-in.

Pricing means the quote you get is the number you pay, with no surprise add-ons once the crew arrives. To get an accurate quote, have your room dimensions, the type of work completed (drywall, flooring, cabinetry), and any areas of concern like vents or upholstery ready before you call. Check the post-construction cleaning service page for details, or head to the main cleaning services page to request a flat-price quote for your space.
This article is general information, not a substitute for advice from a qualified doctor. Consult a qualified healthcare professional about your own circumstances before acting on anything here.
Sources
- Occupational exposure to silica and respiratory disease (PMC article)
- Construction, renovation and demolition waste (Government of Canada)
- How to get construction dust out of house | 6 easy steps (TheHomeFixes)